Front End Testing with GitHub Actions
Until now, most websites I’ve built that need regular front end tests are hosted on Netlify, so when they introduce Netlify build plugins that made my life much easier, I was able to very easily run a bunch of tests on my website and only publish if it passed. However there are limitations to what tests I can run on there, and I had to decide if I wanted to delve into creating my own build plugin, or create a massively over complicated continuous deployment pipeline with GitHub Actions. Any guess what I chose to do.
GitHub Actions
For those not familiar with it, GitHub Actions have now been around for a couple of years, and allows you to setup workflows and automations that are triggered when things happen on your GitHub repository. It can be used as a continuous integration and continuous delivery (CI/CD) pipeline so you can build, test and deploy your website automatically, or you can automate a variety of other things like creating/modifying issues and pull requests as they happen.
Creating a GitHub Action
To create a GitHub Action, first of we create a workflow file in .GitHub/workflows/ in the repo, and create a Yaml file for the workflow/action, eg. .GitHub/workflows/test.yml. To start off we’ll create a workflow file that defines the workflow, sets the platform we’ll run it on and checks out the repository code to get started.
Once you have this workflow, commit and push the changes to GitHub, you can find any actions you have under the Actions tab in your repo, this is also where the logs will appear when the actions are triggered and run.

Triggering our Actions
In the case of our workflow, it will only run when we create a pull request (PR) to the prod branch (if your main branch is named something else, make sure you change it to reflect your branch, eg. main). To test that it works, create a new branch, eg. dev and make a small change to the code, then open a pull request into your main branch. Once the PR is opened, the action will automatically be triggered and will start running the job that we’ve defined, and show the status of it when it’s completed

An excerpt from the pull request, where we can see the checks being run against the code, including the GitHub Action workflow we’re building
So far all we’re doing now is checking out our code, so this should all pass. The good news is the action should also be triggered when the code in the PR updates, so we can continue to make changes to the workflow, push them to the same branch we’ve created (not the main branch), and it’ll run the newest changes to the workflow, without having to keep merging the changes in each time we make updates.

The GitHub Actions tab showing workflow runs, and listing all the different workflows that are part of the repo
We can also view the actions being run under the Actions tab in the repo, here we can view the full history of all of our workflows (when we create more) and the status of the different workflow runs.
Action Steps
At the moment we’ve just checked the code in our repo out, next we need to go through and run the build and test steps. Each step has a number of different properties (we’ll get into more of them later), but for the most part they’ll have a name so you can identify the step that’s running, and the uses property defines what actions package will be used to run the step. Depending on the package being used, we may also pass in some configuration under the with property, which allows defining values for the package to use.
# Name of the action (this is for us to identify it when it runs)
- name: Setup Node
  # The GitHub Action package that we're using in this step, most of the time this is how we'll be defining what a step does
  uses: actions/setup-node@v3
  # Some actions will also require values/config to be passed in, so these are set under the `with` property
  with:
    # Eg. for the setup node package, it can take a value of which node version you want to use
    # https://GitHub.com/actions/setup-node#supported-version-syntax
    node-version: 16
We’ve already checked out the repo code, so next we’ll add a step to setup node to use, and install the packages in the package.json file of my repo. As well as using packages with the uses property, we can also run commands on the action runner (similar to how we would in our terminal), so using the run property, we can set it to run npm install and install all the node modules in thepackage.json file of our repo.
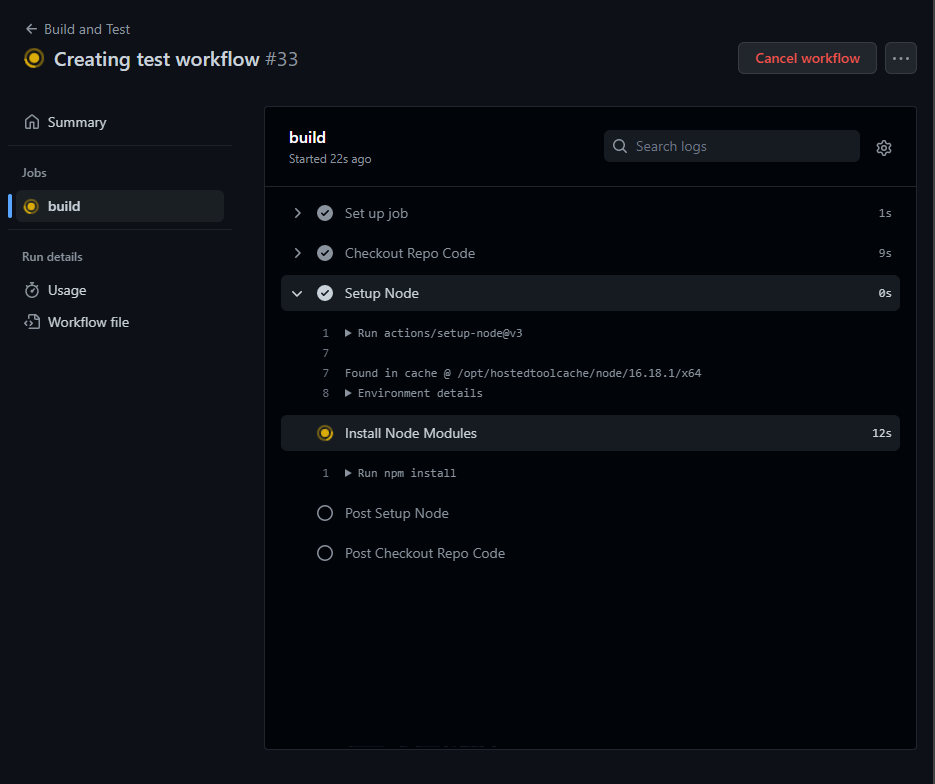
If we access the workflow run via either the Actions tab, or by clicking the Details link for the test in the PR, we can view the steps being run, and the outputs to the console (if there are any). There are a couple of extra steps as well for GitHub to setup the environment, and clean up after everything is completed.
Building and Deploying on Netlify
As we discussed at the start of this post, Netlify does provide an easy build and deploy process, but they also have a CLI so we can do it on GitHub Actions instead. We’ll go through a couple of sections in more detail further on.
- name: Install Node Modules
  run: npm install

- name: Deploy to Netlify
  # If we add an ID to our step, it can be referred to elsewhere in our workflow, this ID must be unique
  # https://docs.github.com/en/actions/using-workflows/workflow-syntax-for-github-actions#jobsjob_idstepsid
  id: build_site
  # For this step we also need to use some environment variables, which we're pulling in from GitHub Secrets
  # https://docs.github.com/en/actions/using-workflows/workflow-syntax-for-github-actions#jobsjob_idstepsenv
  env:
    NETLIFY_AUTH_TOKEN: ${{ secrets.NETLIFY_AUTH_TOKEN }}
    NETLIFY_SITE_ID: ${{ secrets.NETLIFY_SITE_ID }}
  # This step will run a command in the terminal, which runs a custom script we'll create to build and deploy the site
  run: ./_actions/netlify_deploy.sh

  # Once the site is build, we're going to use the GitHub Script package to add a comment to our PR, so that we know everything has built and so we can easily find the preview URL if we want to check something
  # https://github.com/actions/github-script
- uses: actions/GitHub-script@v6
  with:
    script: |
      GitHub.rest.issues.createComment({
        issue_number: context.issue.number,
        owner: context.repo.owner,
        repo: context.repo.repo,
        body: 'The build works! You can view the deploy preview at ${{steps.build_site.outputs.NETLIFY_URL}}'
      })
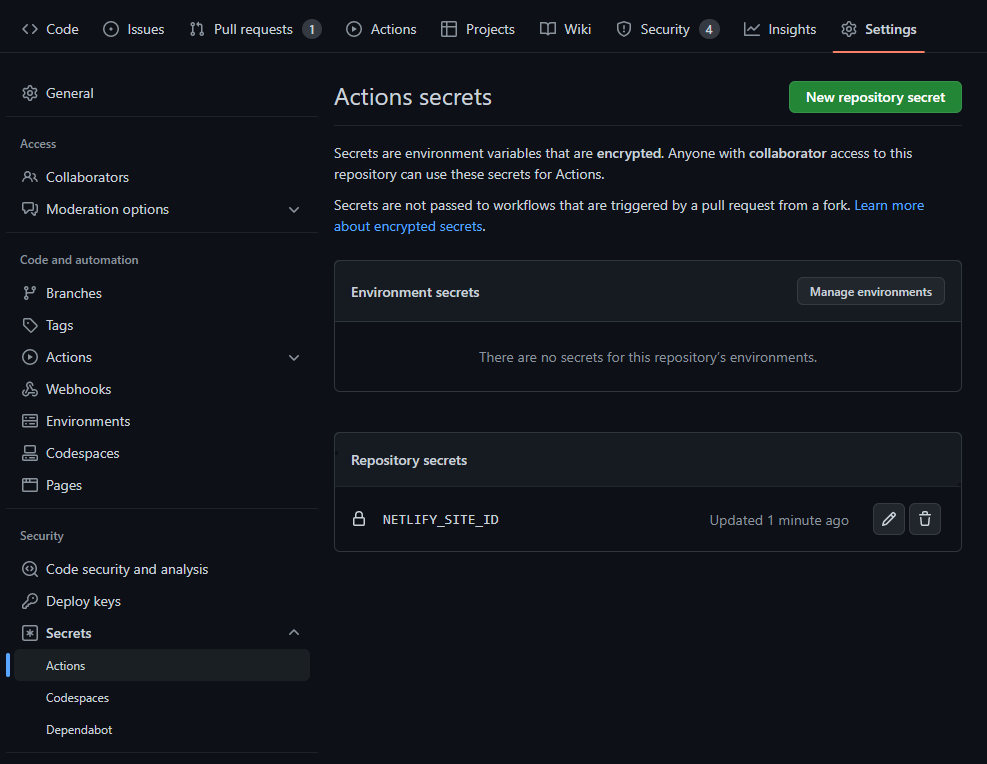
The secret environment variables will need to be added to GitHub for this to work, this can be done under Settings → Secrets → Actions and clicking New repository secret.
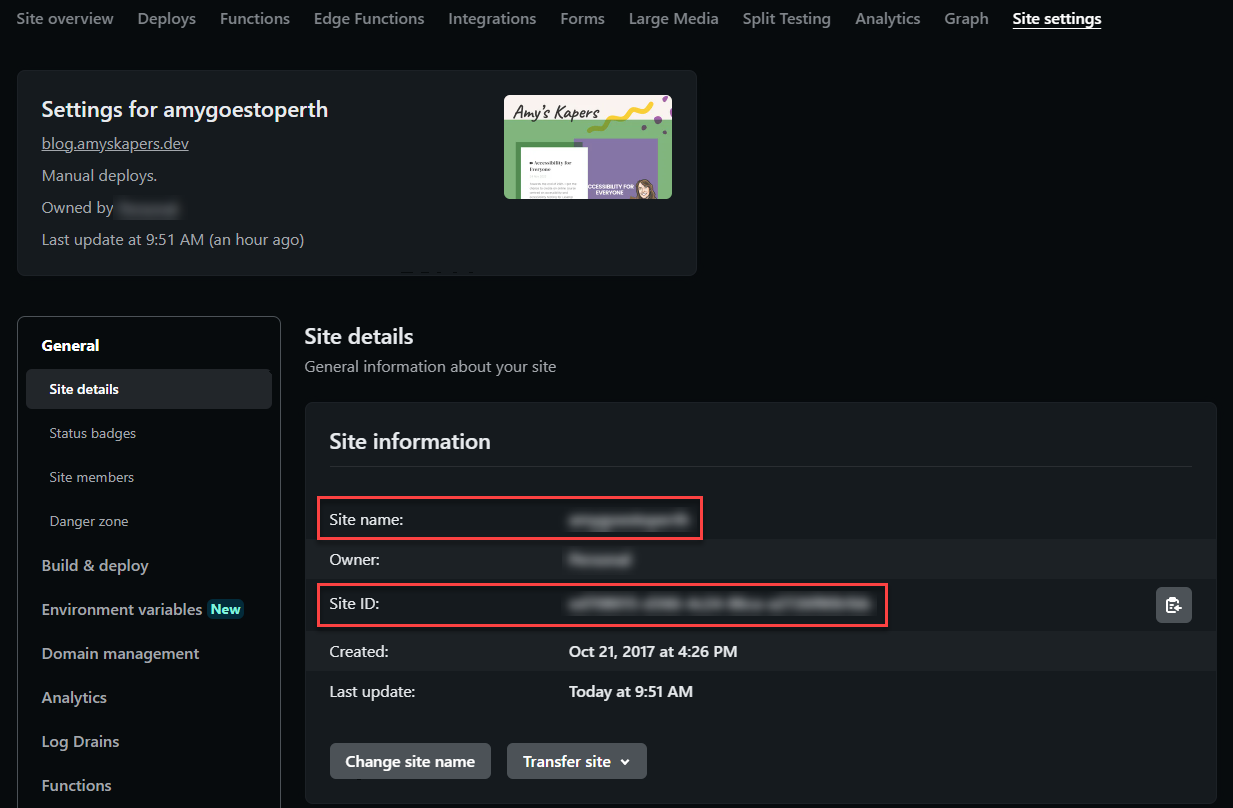
You’ll need to add two secret values, one for NETLIFY_SITE_ID, which you can find in Site Settings → General → Site details in Netlify, either your Site name or Site ID should do, but the ID is likely safer as it can’t be changed.
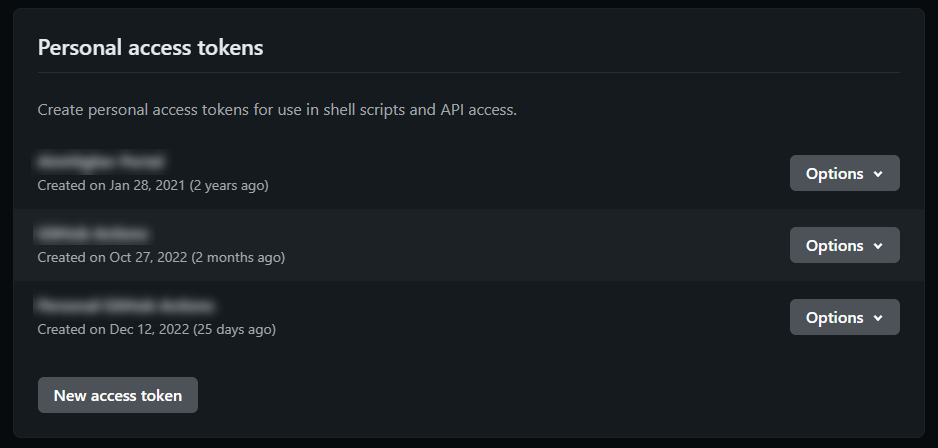
Your NETLIFY_AUTH_TOKEN can be generated from your user profile, it’s good practice to have a new token for each use so you can easily delete it if it gets compromised. Click New access token to generate a new token, and remember that you can’t view it again after.
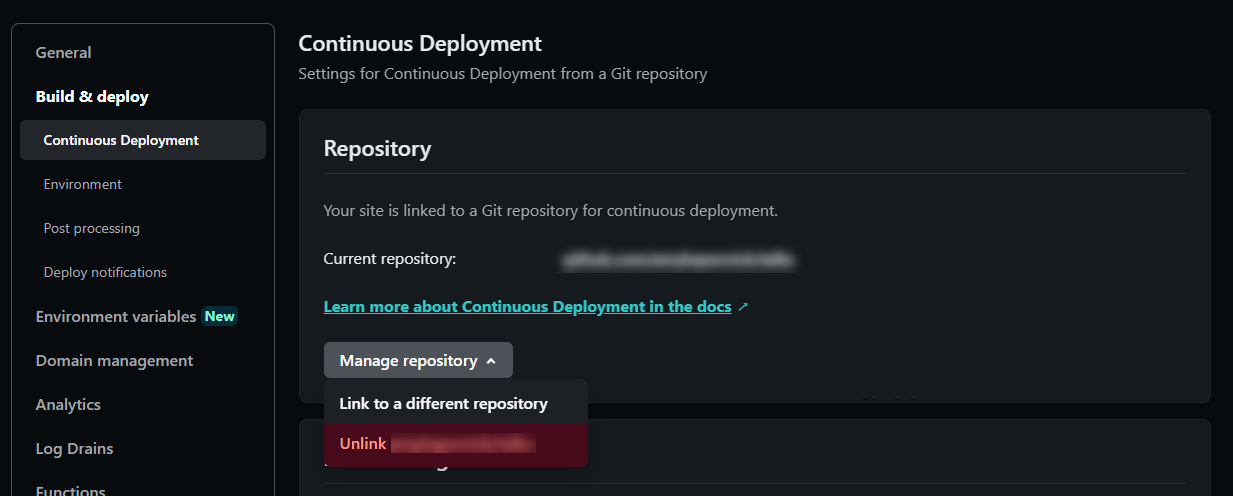
If you’ve already got automatic builds setup for your Netlify site, you’ll also want to unlink your repo from your Netlify settings (Site settings → Build & deploy → Continuous Deployment → Repository), otherwise you’ll end up building the site twice and might have inconsistencies with what’s being built.
Once the environment variables have been set, lets have a look at the script we’re going to use to build and deploy to Netlify. Create a new file called _actions/netlify_deploy.sh.
We’ll also have to install the Netlify CLI to be able to use on GitHub Actions, so run npm install -d netlify-cli to install it as a development dependency.
So that Netlify knows how to build the site, I’ve setup file based configuration with a netlify.toml file, but you can also add extra deploy flags to the command in the script to define the options there.
Quickly looking again at the GitHub script step, here we’re referencing the outputted variable from the end of our deploy script, where we saved the Netlify preview URL in a variable to access later. This will then be included as part of the comment on the PR.
- uses: actions/GitHub-script@v6
  with:
    script: |
      GitHub.rest.issues.createComment({
        issue_number: context.issue.number,
        owner: context.repo.owner,
        repo: context.repo.repo,
        body: 'The build works! You can view the deploy preview at ${{steps.build_site.outputs.NETLIFY_URL}}'
      })
If we push the code changes again and wait for the site to build, this time a comment is added to the PR, which includes the preview URL, a live and functioning version of the website 🥳.

Testing the site
Now that the site is built and has a live URL, we can start running tests on it. To add tests, I could keep adding more steps to the build job, but instead I’m going to add another test job to use. For now we’re just going to run a visual regression test using Percy, and will look deeper at front end testing in a future blog post (for now you can look at the other testing posts)
We just need to add one small change to run the visual regression tests, which is create a [snapshots.yml](https://docs.percy.io/docs/cli-snapshot#snapshot-lists) file for it to use. For now we’re just running tests against the homepage, but more pages can be added here or if you have one snapshots can be run against a sitemap instead.
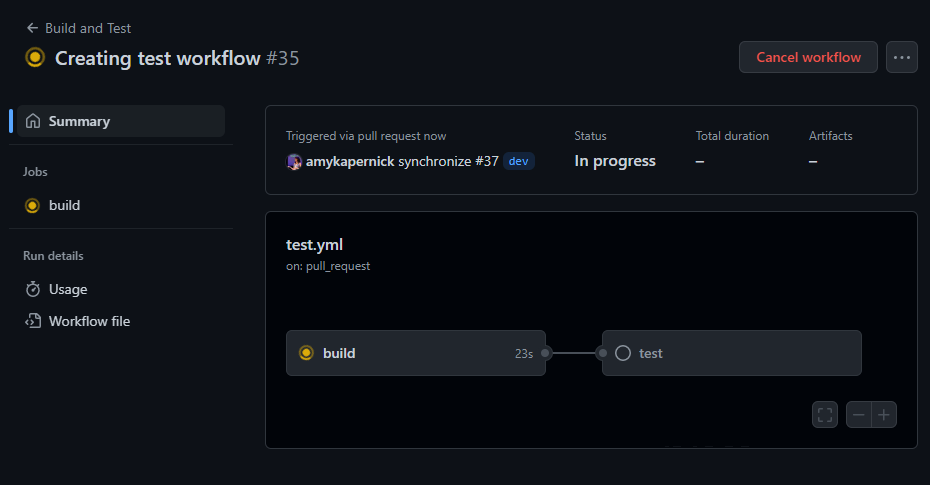
When we push this change to our PR, we should now have two separate jobs appearing in the actions workflow, and can see that the test job is dependant on the build job so won’t start until it’s successfully completed.
Once the tests are successfully completed, you’ll be able to view the results in your Percy project dashboard, and can view the snapshots that were taken.

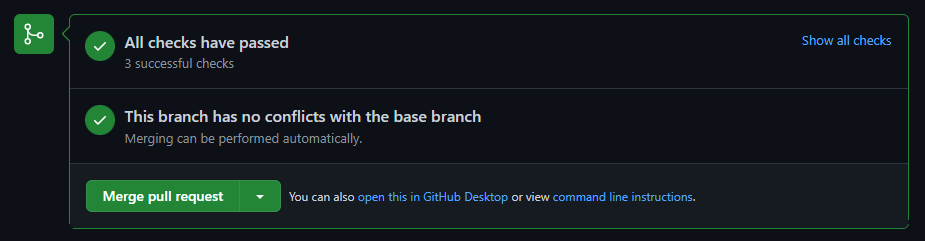
When looking at the pull request, it’s also completed all the checks (and they’ve passed), which means the code is ready to be merged into the main branch!
Deploying and Publishing
Once the build and test pipeline has been setup, we’ll now have this running automatically on all pull requests to the main production branch of the repo, so in theory no code can get merged in without being tested (you may want to setup some branch protection rules to make sure).
We can now safely build and deploy any code merged into the main branch feeling confident in the knowledge that the code is ready to go, so lets setup a new workflow for that in .GitHub/workflows/publish.yml. This will be a lot like the previous build job we completed in the testing workflow, but this time we’re going to pass in a flag to the Netlify script so that we can publish a production version of the website.
Next we’ll make a small tweak to the _actions/netlify_deploy.sh script, to check for the production flag and run a production build if it’s been set.
Once we push these changes and our testing pipeline runs, the pull request should be ready to approve and merge into the main production branch! Under the Actions tab, our new Build and Publish on Netlify workflow will now be running, and once completed our site deployed and live on Netlify!

Whilst more complicated that the previous setup, this workflow gives so much more functionality and enables us to easily run more powerful and extensive front end tests on our website before code is even merged in.
Now you don’t need to worry about breaking things, GitHub Actions will test all that for you and make sure you know before it goes live.